Dungeon farming maps
The Tower of Woodsmith Map is the first choice for a short equipment-selling run: four piles on a 55 m circuit near Wayrest Map. Castle Kingwing Map is the quickest stop near Daggerfall, with one pile on a 12 m circuit. Use the public layout for these maps; a private instance can differ.
Best routes for quick gold
This order favours short runs to saleable equipment, with material quality and access to a major city taken into account. It assumes fresh loot. None of these routes is independently confirmed to refill on every re-entry.
| Priority | Dungeon | Fresh piles | Return circuit | Loose gold per fresh circuit | Main advantage |
|---|---|---|---|---|---|
| 1 | The Tower of Woodsmith Map, Wayrest Map | 4 | 55 m | 4–160 | Most ordinary gear drops per metre among the checked entrance routes; about 18 km from Wayrest Map |
| 2 | Castle Kingwing Map, Daggerfall | 1 | 12 m | 10–20 | Very little walking, about 6 km from Daggerfall |
| 3 | The Balilasivah Manse Map, Totambu Map | 4 | 55 m | 40–80 | Better material rolls than Woodsmith; a longer trip, about 96 km from Wayrest Map |
| 4 | The Fortress of Hearthsmith Map, Wayrest Map | 4 | 55 m | 40–80 | Four-pile alternative, about 29 km from Wayrest Map |
Equipment sales matter much more than the loose coins. Woodsmith averages about 8.9 ordinary weapon or armour drops across four fresh piles; the other two four-pile routes average 6.5. These averages exclude separate magic-item, rarity, personal-bonus and enemy drops. A particular visit can give more or less. Combat, loading, carrying capacity and selling time can change the order.
The routes stay on the entrance floor. Distances run from the arrival point just inside the entrance, through the numbered piles and back. They come from the game's floor and collision data, with ordinary doors opened and locked doors kept shut. Fights, looting time and travel are not included, and the routes have not been timed in live play.
Numbers mark treasure-pile positions. Their icons and contents can vary. Enemy drops and searchable objects are not counted. Regular treasure piles normally keep their 20-minute refresh timer, even when players leave and return. Raised loot piles: Elona and alternatives use the same timer. Searchable objects have separate rules.
| Dungeon | Region | Type | Public size | Piles | Return circuit | From a major city |
|---|---|---|---|---|---|---|
| Castle Kingwing Map | Daggerfall | Crypt | Small | 1 | about 12 m | 6 km north-northeast of Daggerfall |
| Blurk's Guard Map | Sentinel Map | Natural Cave | Medium | 1 | about 12 m | 34 km southwest of Sentinel Map |
| The Tower of Woodsmith Map | Wayrest Map | Barbarian Stronghold | Full | 4 | about 55 m | 18 km northwest of Wayrest Map |
| The Fortress of Hearthsmith Map | Wayrest Map | Vampire Haunt | Full | 4 | about 55 m | 29 km north-northeast of Wayrest Map |
| The Balilasivah Manse Map | Totambu Map | Desecrated Temple | Small | 4 | about 55 m | 96 km southeast of Wayrest Map |
| Castle Greening Map | Glenpoint Map | Crypt | Full | 2 | about 36 m | 81 km north-northeast of Daggerfall |
| The Maelotha Hermitage Map | Sentinel Map | Desecrated Temple | Full | 2 | about 73 m | 33 km south-southeast of Sentinel Map |
City distances are straight-line estimates, not walking distances. Passing within 1 km of an undiscovered destination in Overworld travel reveals it. Check its region as well as its name.
Castle Kingwing
The marked pile is in the arrival room, about 6 m from where you enter. Take it and return without going through another door. The small walking distance makes this a useful stop near Daggerfall, but Crypt enemies can still make the visit dangerous.
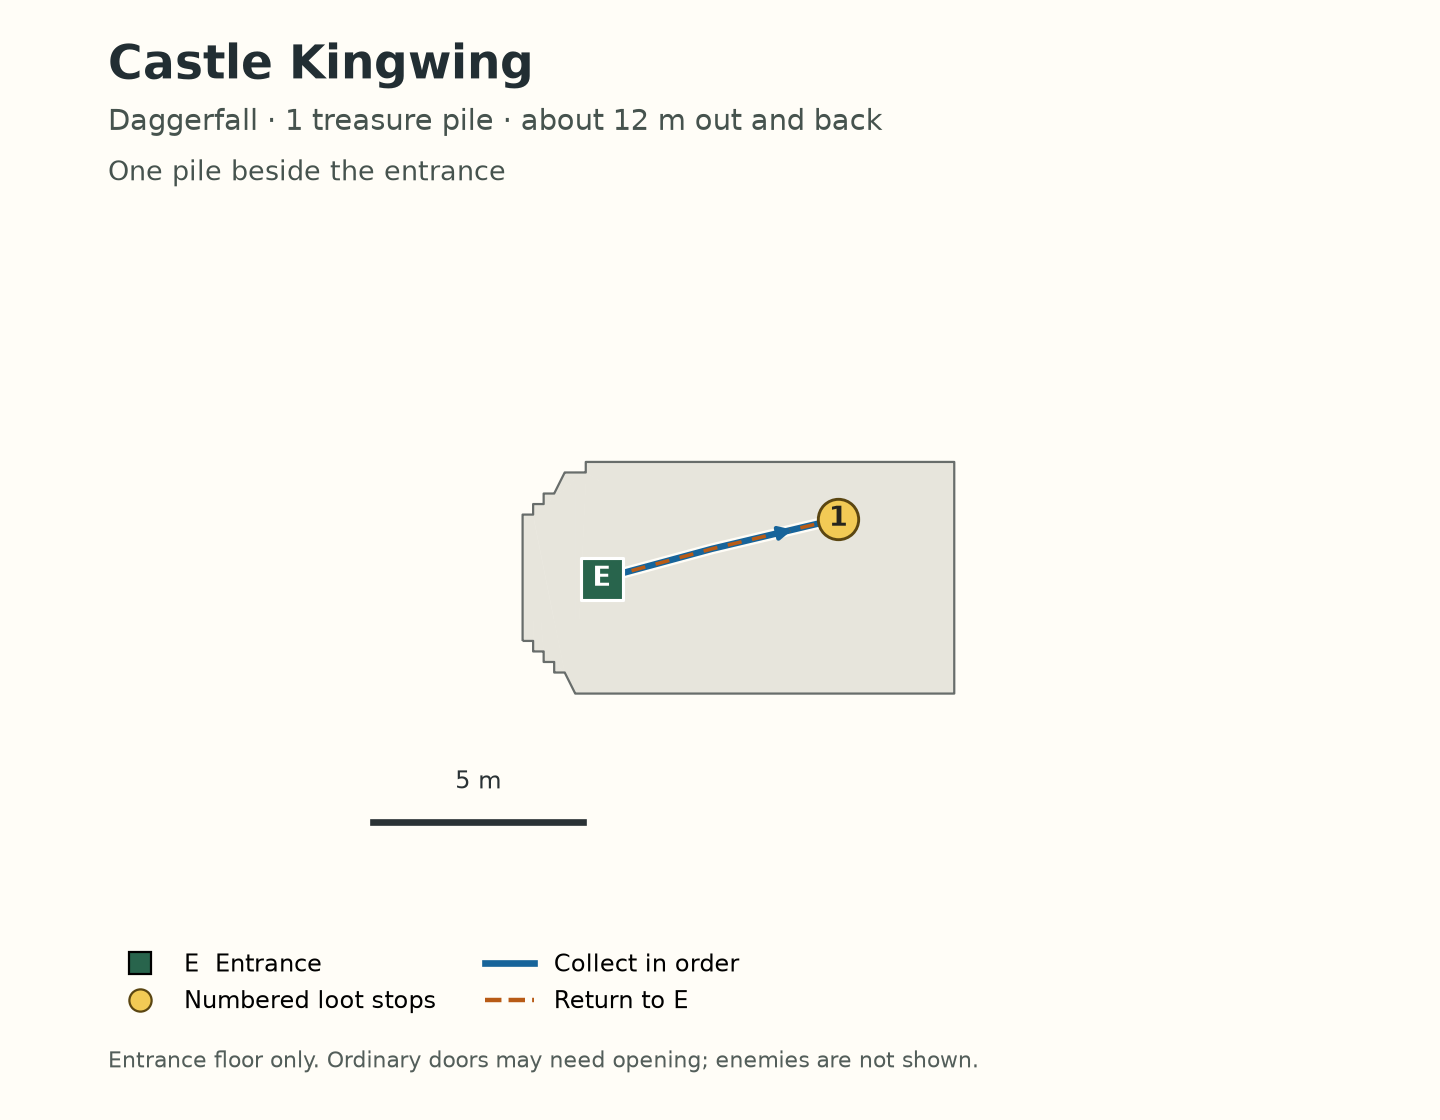
Blurk's Guard Map, in Sentinel Map, uses the same entrance-room plan and pickup route. It is a Natural Cave, so its enemies, materials and treasure table differ from Kingwing's. Both named layouts were checked independently.
The Tower of Woodsmith
Follow the entrance corridor to the first large room. Collect the four marked piles in order, then return along the corridor. The whole circuit is about 55 m, with no stairs, swimming or locked doors on the calculated route.
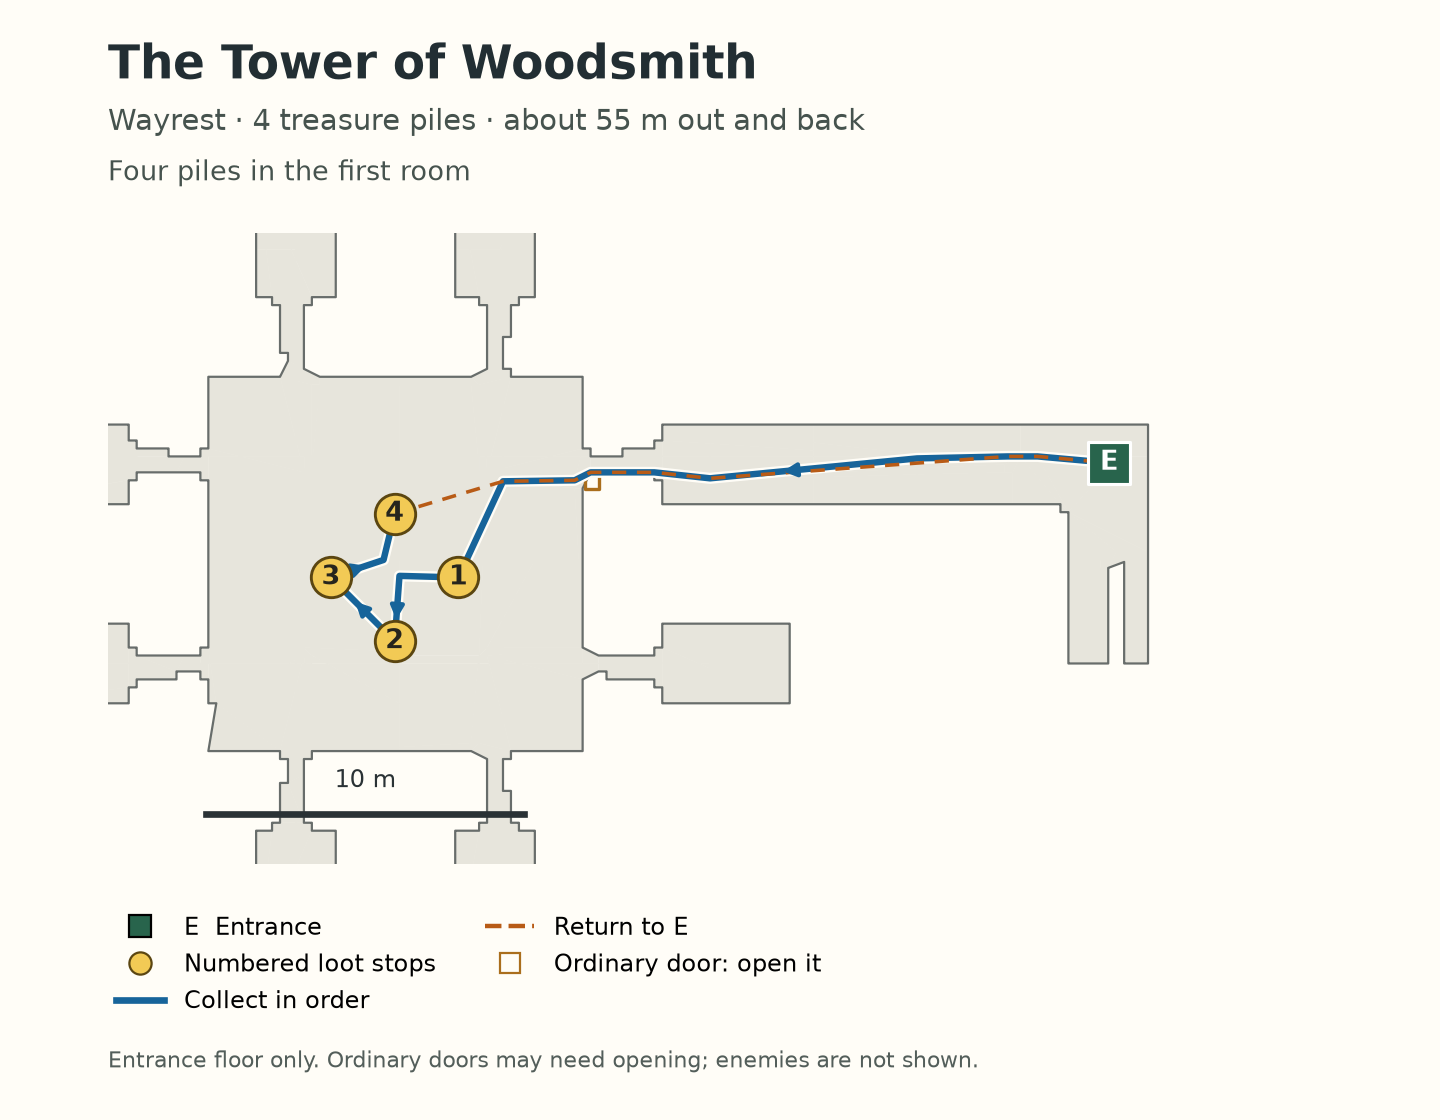
This is the strongest multi-pile entrance route found in the short, dry-floor comparisons. Barbarian Stronghold piles have a 90% initial armour roll and 60% weapon roll, followed by possible extra rolls. That makes equipment sales the main reason to run it. Enemies and the time needed to sell still determine the actual return.
Two checked alternatives share this entrance plan:
- The Fortress of Hearthsmith Map, Wayrest Map: a Vampire Haunt. Its piles use different equipment chances; bring weapons suited to undead.
- The Balilasivah Manse Map, Totambu Map: a Desecrated Temple. It has better material quality than Woodsmith, but more dangerous enemies and a much longer trip from Wayrest Map.
All three routes visit four placed piles. The number and value of items can vary.
Castle Greening
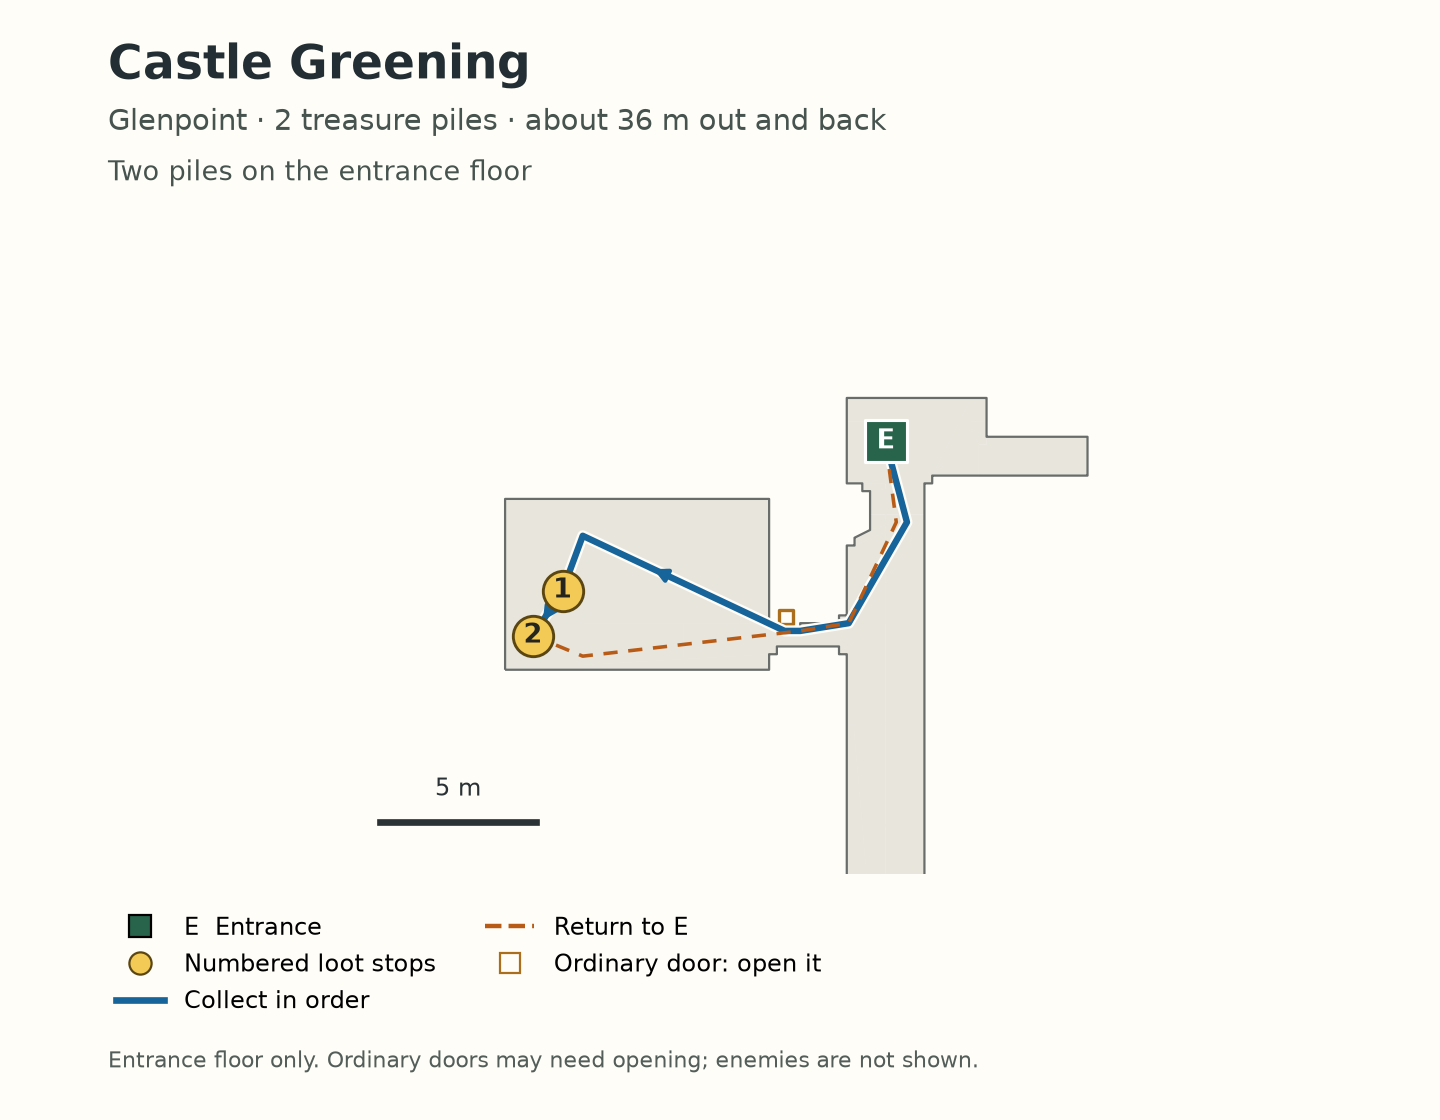
The two marked piles are on the entrance floor. Follow E → 1 → 2 → E for a circuit of about 36 m. This is a compact option for someone already near Glenpoint Map; traveling there from Daggerfall solely for the route may erase the time saved inside.
The Maelotha Hermitage
This Desecrated Temple offers a two-pile route in Sentinel Map. Follow the corridor bends shown below, take both piles, and retrace the return path. The circuit is about 73 m. It is an equipment-material option for a character who can handle Daedra, rather than an easy starter run.
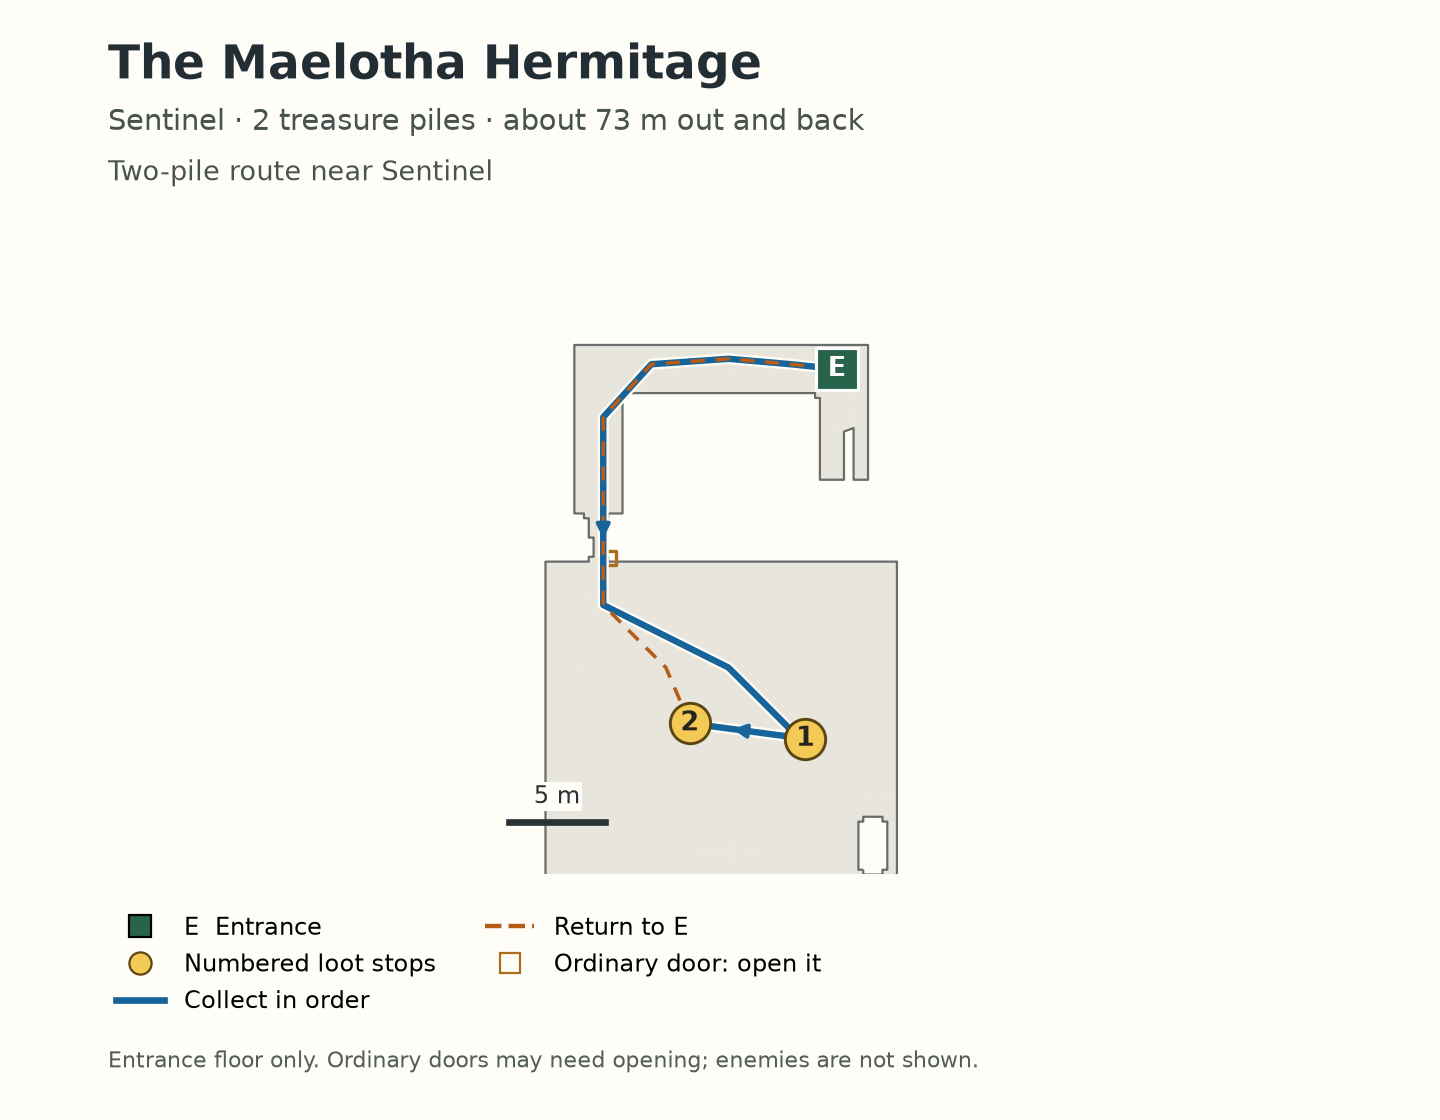
Tap or click a map to open it at full size. Match the room shapes with your automap and rotate it if needed. The maps omit other floors and enemies. Live room state, moving traps and combat can change whether a route is worth repeating.
Sources (72)
- src/systems/shopStock.js
- src/systems/tradeModes.js
- src/systems/item/foundMark.js
- src/systems/repairService.js
- src/net/townEconLaw.js
- src/net/marksLaw.js
- src/systems/silverFinds.js
- src/net/professionLaw.js
- src/net/nodeLaw.js
- src/net/writLaw.js
- src/net/craftWritLaw.js
- src/net/marketLaw.js
- src/net/vendorLaw.js
- src/net/patronLaw.js
- src/net/decorLaw.js
- src/net/homeLaw.js
- src/systems/bounty/bountyBoard.js
- src/systems/bounty/bountyReward.js
- src/systems/searchables.js
- src/systems/eliteFoes.js
- src/systems/quest/actions.js
- src/systems/guild/guildServices.js
- src/systems/gate/gateSpoils.js
- src/systems/raidSpoils.js
- src/systems/serpent/serpentSpoils.js
- src/systems/starfall/starSpoils.js
- src/systems/starfall/starglassRow.js
- src/systems/ketch/ketchSpoils.js
- src/systems/superDungeon/sdSpoils.js
- src/net/superDungeon/sdLaw.js
- src/systems/eliteGates/egSpoils.js
- src/net/eliteGates/egPay.js
- src/systems/arena/arenaLadder.js
- src/systems/arena/arenaBook.js
- src/net/card/cardLaw.js
- src/systems/naval/tradeGoods.js
- src/systems/naval/harbourBoard.js
- src/systems/naval/captainLedger.js
- src/systems/naval/navalPlunder.js
- src/systems/shipyards.js
- src/systems/loot/loot.js
- src/systems/roleplayRealismItems/rriRealism.js
- src/systems/unleveledLoot.js
- src/systems/dungeon/dungeonRespawn.js
- src/world/smallerDungeons.js
- src/formats/mapsFile.js
- src/net/gate/gateBrain.js
- src/systems/teleportAnchor.js
- src/systems/theft.js
- src/systems/stolenGoods.js
- src/combat/formulas.js
- src/systems/banking.js
- src/systems/worldTick.js
- src/net/wire.js
- src/systems/online/onlineLane.js
- src/formats/blocksFile.js
- src/formats/arch3dFile.js
- src/world/rdbLayout.js
- src/world/dungeon/dungeonLayout.js
- src/world/arch3dSeams.js
- src/ai/nav/navBake.js
- src/ai/nav/navmesh.js
- src/player/collider.js
- src/player/enterExit.js
- src/scenes/roomLootHost.js
- src/scenes/searchRoom.js
- src/systems/roomLoot.js
- src/scenes/dungeonContext.js
- src/player/activate.js
- src/world/rmbFlats.js
- src/scenes/lockpickHost.js
- src/systems/lockpick/lockpickItem.js
Last edited 27 Oct 2026. View history · What links here.